Following Production Practices
Setting up Equipment:
Tripod:
The DV6000 tripod is a simple tripod to setup. I extended the legs to their maximum length and the removed the baseplate to screw it onto the bottom of the camera before slotting it back into place.
Camera Settings:
The Canon750D is a DSLR camera, this allowed me to use manual mode to adjust the camera's ISO, Shutter speed and aperture, also known as the exposure triangle.
ISO:
ISO is the level of sensitivity of your camera to available light. It is typically measured in numbers, a lower number representing lower sensitivity to available light, while higher numbers mean more sensitivity. More sensitivity comes at the cost though, as the ISO increases, so does the grain/noise in the footage.

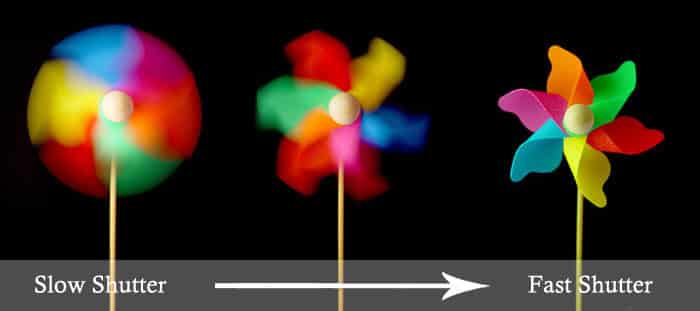
Shutter Speed:
Shutter Speed is the length of time a camera shutter is open to expose light into the camera sensor. Shutter speeds are typically measured in fractions of a second, when they are under a second. Slow speeds allow more light into the camera sensor and are used for low-light and night photography, while fast shutter speeds help to freeze motion.
Aperture:
Aperture is the hole within a lens, through which light travels into the camera. The larger the hole, the more light passes to the camera sensor. Aperture also controls the depth of field, which is the portion of a scene that appears to be sharp. If the aperture is very small, the depth of field is large, while if the aperture is large, the depth of field is small.
In order to suit the low lighting of the indoor set I had to adjust these settings to allow more light into the camera, this meant lowering the shutter speed while using a higher ISO and aperture to increase the cameras sensitivity to light. However I did find these settings lead to a grainier image that had a very shallow depth of field, this caused issues with quality. To correct this I increased the level of lighting in the scene and took test shots, until I found the correct settings.

White Balance:
The indoor shoot also meant I was shooting under tungsten lighting, this results in the footage looking yellow. To reduce this I used the 750Ds white balance preset 'tungsten' to correct the lighting, this meant avoiding having to make the corrections in post production and improved the overall quality of the footage.

Shoot Diary/Account:
At the beginning of this shoot I planned to finish the filming within a matter of two to three days, however due to some complications regarding my actors availability I was unable to finish the shoot within this timescale. The first shoot I did was the outdoor sequence that appears towards the end of the film, this shot was actually one of the easiest as I was well prepared for any variables that could affect the filming. I planned the shoot for a sunny day so the ground would be safe and less muddy but also to protect the equipment from any environmental damage e.g Rain, this preparation paid off as we had no issues with the weather.

Luckily I'd also prepared spare footwear for my actor so this was not an issue. In the end this shoot took roughly 2-3 hours and we captured all the footage I had planned to film in one outing. While on this shoot I had to remember that I was going to composite tanks into the footage thus when shooting a shot that they would appear in I had to note down the suns position, camera focal length and its height as without this information I would struggle to insert the tanks, having to do this did prolong the length of time I spent filming.

Aside from this the shoot was successful, at the beginning of the day I had then planned to return to my house and finish the last 4 - 5 inside shots I needed from my actor however he was unable to stay so I had to reschedule the shoot for a later date. In the same week I then choose to shoot the indoor scenes with my other actor, the indoor shoot turned out to be much harder than any other shoot I'd done before, due to a lack of sufficient lighting equipment. This lack of light meant I had to use the tungsten lights in the room, which were dark, as I had not planned for this I forgot to setup my white balance which left my footage looking orange and unprofessional. To make things worse I decided that I was going to use my green screen to remove the room from the background of the film, this took a long time to setup and had been crumpled up so had to be soaked so to straighten it out, once straight I was ready to begin filming.

 |
| This is one of the shots from the first indoor shoot, it is evident that there is an orange tint and poor lighting, this footage was scrapped. |
Due to the low lighting I had to set my ISO to the highest setting of 6400 to allow enough light into the camera, increasing the amount of noise in the footage, I also had to lower my shutter speed which meant any movement was blurry and finally the aperture of my lens had to be opened up enough to allow light in, however by widening the aperture I created a very shallow depth of field making it extremely hard for me to focus on a object that was moving or when I was moving the camera.
Once I had reviewed this footage I began to edit it however it occurred to me that the quality of what I had captured was too poor to use in my production, this meant I had to re-shoot all the indoor shots again. The second time I did the shoot however I ensured that I corrected all my errors by adding more lighting and correcting my white balance. I also decided to not use a green screen as it took too much time to edit the clips for the results it produced.
 | |||
| This shot was taken after I made the adjustments to my lighting and camera settings, including white balance. |
Once I had completed the filming for the indoor shoot and outdoor shoot I only had about 5 shots left to take of my second actor who appeared in the outdoor scene. However it proved to be more than difficult to get him to come back to finish filming due to a range of reasons, eventually I had to go to his house and film him on a green screen, this took about an hour to setup and film and was highly inconvenient, it meant that while I was editing I had to use placeholder footage instead of the footage I actually needed. However in between the time of each shoot I had time to piece together my offline edit and finish some of my VFX shots, so this time was not wasted.
 |
| Here is one of the few reaction shots I required that had to be shot at his home on a green screen. |
No comments:
Post a Comment