Tuesday, 5 January 2016
Friday, 11 September 2015
P5 post-production processes
Post-production processes
Step 1: Logging Rushes and Creating an Edit Decision List

ensuring that the footage matched the 1920x1080 size of my sequence.

Once
in Premier Pro I reviewed each variation of each shot I had taken, once
I'd found my favourite variation from each shot I renamed them in
accordance to their name on the shot list I created in the
pre-production stage e.g shot 1, shot 2, shot 3 etc. I then deleted the
unusable variants from the project, this still meant I could re-import
them if I changed my mind.
This saved time as I did not have to rename shots that I would of never used.
Producing and Reviewing an Offline Edit
Offline editing is part of the post-production process of film making production in which raw footage is copied and edited, without affecting the camera original film stock or video tape. Creating an offline edit allowed me to understand how the final film would look and helped me to make decisions on what footage to completely remove and which footage should be trimmed down.
 |
| During the Offline Edit the Razor tool (I) is the most useful as it allows the user to quickly cut and delete clips to a precise length. |

While creating my offline edit I referred to my shot list, script and storyboard so that my my final result reflected the story I'd created in the planning stage, without this coordination I could become confused on where to place clips. Any footage I didn't have I replaced with a placeholder title sequence that I created in Premiere Pro until it had been filmed. However during the editing phase I found that when I put the sequences together they didn't make sense, thus did not tell the story in the desired way. This meant I had to make some variation in the edits so to remove any issues that had been created in the planning phase.
Below shows an example of when I had to change my edit and how it varied from the storyboard and script:

 |
| This example above shows that I had to change elements of my edit due to technical restraints as I found I was unable to insert actors into the tank models given the time I have had to complete the project. |
Once I had completed my offline edit my film was well structured in terms of the story and I was ready to move onto creating and applying the relevant visual effects, motion graphics, transitions, color correction/grading and adding audio to create the online edit.

Step 3: Applying appropriate Visual Effects and Transitions
In order to create smooth transitions between clips I used Premiere Pro's default transition effects. I then dragged the effect onto the end of the clip I wanted the transition to occur on.

 |
| In the image above the Zoom video transition has been applied to the footage, this means that when this video ends it will transition to the next clip by zooming into it. |
Inserting 3D Tanks:
This stage required me to match the shooting conditions of the scene e.g Camera position and Lighting to match the scene properties in 3DSmax.
Camera Mapping: In order to place 3D objects into a scene I had to go through the process of camera mapping, camera mapping means recreating the position of the camera in the 3D software in order for perspective to be correct.

Creating the lighting: To light my scene in 3DSmax I used the V-ray sunlight tool to create a source of light, however this light was over exposed and did not reflect the lighting in my video footage. In order to match the lighting this is the process I had to go through.

Render Setup: Once I had finished setting up the scene I was ready to render. To ensure that I had the most realistic looking results I adjusted the following render settings.
AE composition: The final stage of this effect was compositing the rendered tank image over the original footage in Adobe After Effects. I imported the tanks beauty and shadow pass into the project and dragged them into my composition, after this I key framed their scale for the tank to grow in size as it the lightning strikes the table.
 |
| Here I have 'solo'd' the beauty pass layer to show that layer only |
 |
| This is the beauty pass when solo'd. |
Add Lightning Effect:
First I created a solid colour layer that I placed at the top of the composition, I then applied the lightning effect, this turned my solid layer to resemble lightning however I still had to adjust some parameters of the effect, such as positioning, colour and speed I also applied a glow effect to emphasise the effect.

Creating Muzzle Flashes:
In order to create the flashes from the muzzle of the tanks barrel I had to import 2D video assets from Video Copilots action essentials pack that contains hundreds of stock footage of explosions, fire and smoke that have been preprepared for composition, meaning when overlaid on footage the background is removed.
The image below is an example of the stock footage used.

Once I'd finished creating the effects in After Effects I then exported these clips to mov format at 24 FPS, to match the FPS of my Premiere Pro sequence. I then imported these edited clips into Premiere Pro and replaced the placeholder videos with the new edits.
Colour Grading
The final stage of the editing process before I rendered my project was the colour grading phase, in order to colour grade I used 'Magic Bullet Looks' an industry standard colour grading software that allowed me to accurately create a 'look' that would correspond with the tone/theme of the video.
In order to create the look I wanted I first applied one of the software's default presets that matched the theme of the video and then used this as a base to make any adjustments to fit my footage.
In order to create the look I wanted I first applied one of the software's default presets that matched the theme of the video and then used this as a base to make any adjustments to fit my footage.

Step 4: Linking Audio to Visuals and applying audio effects
For the base audio track of this production I chose to use the track 'adrenaline' from the game Call of Duty Black Ops 2 as it is fast paced and upbeat, grabbing the audiences attention, it also suits well with my theme and genre. To maximize the impact of the track on the audience I ensured that I cut my visuals to match the beat of the music.
Voice Over:
During the pre-production phase I planned for a voice over to accompany my visuals as the video uses advert format in the beginning scenes. In order to record the voice over I found a professional voice actor who was willing to record the script. As my actor was in Russia we used Teamspeak to talk and so I could listen to how he sounded and then direct him, to ensure the voice corresponded with the theme/genre of the video. Once I had the voice overs I imported them into Premiere Pro and dragged them into the timeline ensuring they corresponded with the correct video clip by referring to my script, as seen below:
Cam Direction
After painting the model the actor calls his friend (Actor 2) over in a really OTT style, MS of friend walking over sped up and then slowed down as he sits to emphasise the action (camera follows his movement)
|
V/O.
RALLY YOUR FRIENDS FOR THE ULTIMATE BATTLE
|

Once I'd linked the audio to the clip I had to sometime cut the audio so it came in at the correct time, this meant using the ripple edit tool to cut off the beginning and endings of the audio clips.

Sound Effects:
In the end half of the video I required sound effects to match with the visuals. In order to create realistic and high quality SFX I used my Rode Video Mic-R connected to my Canon 750D to record the desired sounds. If I was unable to make an effect I downloaded royalty free sound effects from online sites, or recorded sound from video games. I then imported these sound effects into Premiere Pro and using my script I aligned the sound effects with the appropriate visuals as I had planned in the script.
 |
| The image above shows the project finished, with all effects applied. |
P4 d) Following Production Practices
Following Production Practices
Setting up Equipment:
Tripod:
The DV6000 tripod is a simple tripod to setup. I extended the legs to their maximum length and the removed the baseplate to screw it onto the bottom of the camera before slotting it back into place.
Camera Settings:
The Canon750D is a DSLR camera, this allowed me to use manual mode to adjust the camera's ISO, Shutter speed and aperture, also known as the exposure triangle.
ISO:
ISO is the level of sensitivity of your camera to available light. It is typically measured in numbers, a lower number representing lower sensitivity to available light, while higher numbers mean more sensitivity. More sensitivity comes at the cost though, as the ISO increases, so does the grain/noise in the footage.

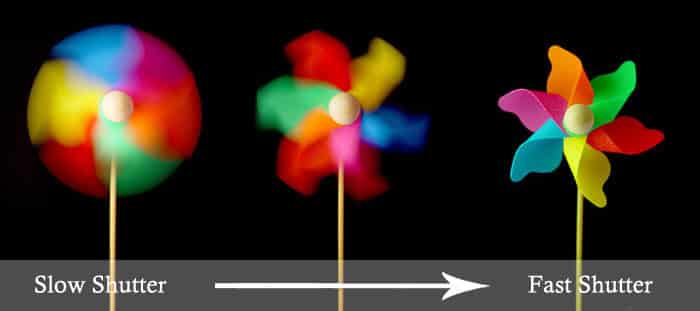
Shutter Speed:
Shutter Speed is the length of time a camera shutter is open to expose light into the camera sensor. Shutter speeds are typically measured in fractions of a second, when they are under a second. Slow speeds allow more light into the camera sensor and are used for low-light and night photography, while fast shutter speeds help to freeze motion.
Aperture:
Aperture is the hole within a lens, through which light travels into the camera. The larger the hole, the more light passes to the camera sensor. Aperture also controls the depth of field, which is the portion of a scene that appears to be sharp. If the aperture is very small, the depth of field is large, while if the aperture is large, the depth of field is small.
In order to suit the low lighting of the indoor set I had to adjust these settings to allow more light into the camera, this meant lowering the shutter speed while using a higher ISO and aperture to increase the cameras sensitivity to light. However I did find these settings lead to a grainier image that had a very shallow depth of field, this caused issues with quality. To correct this I increased the level of lighting in the scene and took test shots, until I found the correct settings.

White Balance:
The indoor shoot also meant I was shooting under tungsten lighting, this results in the footage looking yellow. To reduce this I used the 750Ds white balance preset 'tungsten' to correct the lighting, this meant avoiding having to make the corrections in post production and improved the overall quality of the footage.

Shoot Diary/Account:
At the beginning of this shoot I planned to finish the filming within a matter of two to three days, however due to some complications regarding my actors availability I was unable to finish the shoot within this timescale. The first shoot I did was the outdoor sequence that appears towards the end of the film, this shot was actually one of the easiest as I was well prepared for any variables that could affect the filming. I planned the shoot for a sunny day so the ground would be safe and less muddy but also to protect the equipment from any environmental damage e.g Rain, this preparation paid off as we had no issues with the weather.

Luckily I'd also prepared spare footwear for my actor so this was not an issue. In the end this shoot took roughly 2-3 hours and we captured all the footage I had planned to film in one outing. While on this shoot I had to remember that I was going to composite tanks into the footage thus when shooting a shot that they would appear in I had to note down the suns position, camera focal length and its height as without this information I would struggle to insert the tanks, having to do this did prolong the length of time I spent filming.

Aside from this the shoot was successful, at the beginning of the day I had then planned to return to my house and finish the last 4 - 5 inside shots I needed from my actor however he was unable to stay so I had to reschedule the shoot for a later date. In the same week I then choose to shoot the indoor scenes with my other actor, the indoor shoot turned out to be much harder than any other shoot I'd done before, due to a lack of sufficient lighting equipment. This lack of light meant I had to use the tungsten lights in the room, which were dark, as I had not planned for this I forgot to setup my white balance which left my footage looking orange and unprofessional. To make things worse I decided that I was going to use my green screen to remove the room from the background of the film, this took a long time to setup and had been crumpled up so had to be soaked so to straighten it out, once straight I was ready to begin filming.

 |
| This is one of the shots from the first indoor shoot, it is evident that there is an orange tint and poor lighting, this footage was scrapped. |
Due to the low lighting I had to set my ISO to the highest setting of 6400 to allow enough light into the camera, increasing the amount of noise in the footage, I also had to lower my shutter speed which meant any movement was blurry and finally the aperture of my lens had to be opened up enough to allow light in, however by widening the aperture I created a very shallow depth of field making it extremely hard for me to focus on a object that was moving or when I was moving the camera.
Once I had reviewed this footage I began to edit it however it occurred to me that the quality of what I had captured was too poor to use in my production, this meant I had to re-shoot all the indoor shots again. The second time I did the shoot however I ensured that I corrected all my errors by adding more lighting and correcting my white balance. I also decided to not use a green screen as it took too much time to edit the clips for the results it produced.
 | |||
| This shot was taken after I made the adjustments to my lighting and camera settings, including white balance. |
Once I had completed the filming for the indoor shoot and outdoor shoot I only had about 5 shots left to take of my second actor who appeared in the outdoor scene. However it proved to be more than difficult to get him to come back to finish filming due to a range of reasons, eventually I had to go to his house and film him on a green screen, this took about an hour to setup and film and was highly inconvenient, it meant that while I was editing I had to use placeholder footage instead of the footage I actually needed. However in between the time of each shoot I had time to piece together my offline edit and finish some of my VFX shots, so this time was not wasted.
 |
| Here is one of the few reaction shots I required that had to be shot at his home on a green screen. |
P4 c) Following Safe Working Practises
Risks and how they were addressed:
Before shooting I carried out a risk assessment during my recce of each shoot location to find and evaluate the risks involved in shooting in those locations. My film does involve both indoor and outdoor scenes meaning a wide range of risks had to be assessed. The reason for doing this was so I could reduce the chance of breaking equipment and injuring crew or cast.

When shooting indoors we were in a confined space filled with lots of equipment, in order to avoid an accident I ensured that actors knew where to stand and were aware of the risks of tripping, I also moved unused equipment to the side of the room out of harms way. This meant nobody injured themselves or broke equipment during the shoot. I was also ensuring that electrical sockets were not being misused, ensuring that a safe number of sockets were in use to reduce fire hazard.

When shooting at my outdoor location I planned in advance for the shoot to take place on a sunny day as poor weather conditions can demoralise crew and cast, damage equipment and lead to slippery conditions increasing the chance of injury, avoiding this was key to the success of the shoot. However in case it did rain I had prepared waterproof clothing and footwear for myself and others.

When on set I used my risk assessment table to analyze the risks to myself and my actors, the table is shown below:
 Trip Hazard:

Damaging Props:
In this production we used model tanks and a board as props. If these props had been damaged by being dropped they could of been smashed thus we would be unable to use them, this would cost me time and money to replace the props and would postpone filming. To prevent this while on set I made sure only I handle the props and told actors to be careful when handling them. The image below shows one of the props.

 Actors not arriving, Weather, tripping, footwear and lack of communication:
This still shows the range of risks the faced us during the outdoor shoot, my main risk for this shoot was my actors not turning up, to reduce this risk I helped transport them to the location as it was a rural location this helped me to stop this risk. As we were shooting outdoors in the weather did pose a threat, heavy rain would of stopped the shoot, to avoid this I scheduled the shoot for a sunny/overcast day that would not threaten shoot conditions. I also packed waterproof clothing and covers for the equipment to reduce the effect of any rain, this also included wearing suitable footwear e.g Wellies to stop us getting wet and muddy feet. The final risk was a lack of communication due to being in a field, to reduce the impact of any consequences of this risk I informed locals of our whereabouts told friends and family and bought multiple fully charged phones to the shoot.


Before shooting I carried out a risk assessment during my recce of each shoot location to find and evaluate the risks involved in shooting in those locations. My film does involve both indoor and outdoor scenes meaning a wide range of risks had to be assessed. The reason for doing this was so I could reduce the chance of breaking equipment and injuring crew or cast.

When shooting indoors we were in a confined space filled with lots of equipment, in order to avoid an accident I ensured that actors knew where to stand and were aware of the risks of tripping, I also moved unused equipment to the side of the room out of harms way. This meant nobody injured themselves or broke equipment during the shoot. I was also ensuring that electrical sockets were not being misused, ensuring that a safe number of sockets were in use to reduce fire hazard.

Props getting damaged could cause issues with the schedule as they would have to be repaired absorbing more time than necessary. This could be caused by actors dropping or snapping the props.
To reduce this risk I ensured the props were handled carefully and were only used when shooting, making sure everyone was aware of where they were, this meant no props were damaged on the day of the shoot, this was vital as the props involved in the indoor shoot were the main focus of the advert.
When on set I used my risk assessment table to analyze the risks to myself and my actors, the table is shown below:


The shot above is one of the indoor shots I took with another actor indoors, the space we were shooting was made dangerous by the amount of equipment laying around, presenting real trip hazards if people were not aware of this it could of resulted in injury or damaged equipment. To avoid this I ensured that wires and equipment were put to one side and made others aware of the danger.
In this production we used model tanks and a board as props. If these props had been damaged by being dropped they could of been smashed thus we would be unable to use them, this would cost me time and money to replace the props and would postpone filming. To prevent this while on set I made sure only I handle the props and told actors to be careful when handling them. The image below shows one of the props.


This still shows the range of risks the faced us during the outdoor shoot, my main risk for this shoot was my actors not turning up, to reduce this risk I helped transport them to the location as it was a rural location this helped me to stop this risk. As we were shooting outdoors in the weather did pose a threat, heavy rain would of stopped the shoot, to avoid this I scheduled the shoot for a sunny/overcast day that would not threaten shoot conditions. I also packed waterproof clothing and covers for the equipment to reduce the effect of any rain, this also included wearing suitable footwear e.g Wellies to stop us getting wet and muddy feet. The final risk was a lack of communication due to being in a field, to reduce the impact of any consequences of this risk I informed locals of our whereabouts told friends and family and bought multiple fully charged phones to the shoot.


P4 b) Use of Pre-Production material
Pre-Production Material
To prepare for my shoot I have produced a script, storyboard, equipment list and schedule in order to transferred my concept into reality.
Script:
When on set I took a copy of my script in order to refer back to and also keep on schedule. Throughout the production process my script helped to remind me and help my actors to understand why they were doing what I had planned, this helped them put more effort into their performance and gave everyone more perspective. Whenever I questioned a shot on the shot list I referred to the script so to remind myself of the idea behind the shot and how it played into the whole concept. This gave me the ability to change my shots/add additional shots to further improve the quality of the film both in terms of cinematography and the story telling aspects.
Shot List:
After writing a script that outlined the overall plot of the production in order to be successful on the day of the shoot I wrote an in depth shot list that recorded all the shots I intended to shoot, in a chronological order. I did this to reduce the time spent on set having to decide what shot I wanted allowing me to focus more on the quality of the shot.
Storyboard:
A film storyboard is a large comic of the film or some section of the film produced beforehand to help film directors, cinematographers and clients visualize the scenes and find potential problems before they occur. Storyboards also help to save time. My storyboard has also included arrows and instructions that indicate movement of either the camera and the actors. During shooting I referred to my storyboard to improve my directing and cinematography but also showed the actors to develop their understanding of the shots. During the drawing process I also removed and changed ideas that were from the script as visually they did not adhere to the theme of the video.
I have tried to stick with my original script and storyboard as closely as possible during production, however this sometimes lead to issues when filming, meaning slight adjustments had to be made to the shot list.
Here are some examples of how I adhered to the storyboard and Script


I have tried to stick with my original script and storyboard as closely as possible during production, however this sometimes lead to issues when filming, meaning slight adjustments had to be made to the shot list.
Here are some examples of how I adhered to the storyboard and Script


When on set I used a printed copy of the storyboard to match the framing of the shot that I had visualised when drawing the storyboard, this helped me to realise a more accurate copy of my concept.
Filming for VFX:
When I was on set I had to ensure that when I took a shot it was suitable for the Visual Effect I was planning to implement, during my recce I established where my camera would be and where it would be pointing. Due to the nature of some effects it was important for me to note down the time (to find out the position of the sun, which effects lighting), the height of the camera from the ground and the focal length of the lens I was using so to recreate the FOV of the camera, these factors would then allow me to accurately recreate the scene in 3DSMax and add in the 3D objects.
When filming on the green screen I ensured that the background and subject was well lit so to produce higher quality footage.
Equipment/Props List:
Equipment and props list helped me to ensure I had not forgotten any vital equipment and props that would be key to filming any specific scene. When on set I used this pre-production material to monitor my equipment and include it in the scene when it was required.
Schedule:
Planning ahead of the shoot date is vital to success on set, the schedule helped me to keep actors and myself organised and complete the shoot within the set timescale and ensure that I had the correct props and equipment at the set time. Having a schedule also gave me objectives to achieve and motivated me to complete the tasks.
P4 a) Setting up Equipment
Setting up my equipment correctly was vital in ensuring that I created a safe filming environment but also meant that I could maximise the quality of my shots.


 |
| An example of a shot in which I used my green screen, camera and tripod! |

P3 legal or ethical issues identified and resolved
Legal and Ethical Issues:
Legal:
FILMING IN THE UK
If you want to film on public land you will need permission from the appropriate local authority or council. They are responsible for public land, public buildings, roads and parking. The UK screen agencies can help you get in touch with the appropriate local authority contact.
Entry onto other private property usually requires permission from the property owner and if you want to film on Private property filming may be prohibited or restricted within an area of property by the property owner. However a property owner generally cannot restrict the filming of the property by individuals who are not located within the bounds of the property.

UK Copyright Laws:
Copyright is a legal right created by the law of a country that grants the creator of an original work exclusive rights for its use and distribution. This is usually only for a limited time.

When creating my work it is important that I do not infringe any copyright laws as this would mean I would be liable for litigation. When using audio and music I should ensure that I have the owners permission to use the music or the audio is royalty free. I can get the owners permission by contacting them via email and telling them what I intend to do with their work and state that I do not intend to use it for profit. For my work I am using the music track called 'Adrenaline' by BigGiantCircles (Jimmy Hinson)

In this circumstance however the artist has already provided users with the terms of using his music which are seen below:

Provided I follow these terms I will be not be breaching copyright laws.
Location Release Form:
It is illegal in the UK to film on private land without the landowners consent and could result in litigation and/or large fines. To ensure that this does not happen I have created a location release form to prove that I have permission to film on this property. This form states the timescales in which I will be filming e.g the date and also the landowners signature.
Below is the form:

Model Release Form:
Model release forms are used to protect me from being sued by my actors should they be unhappy with how they are being represented.
- the actor has read and understood information about the project
- the actor has been given the opportunity ask questions
- the actor voluntarily agrees to participate in the project
- the actor understands that they can withdraw at any time without giving reasons and without penalty
- procedures regarding confidentiality are explained.
- signatures and dates of signing for the participant and the researcher
Below shows the signed copy of the consent form:

Subscribe to:
Posts (Atom)